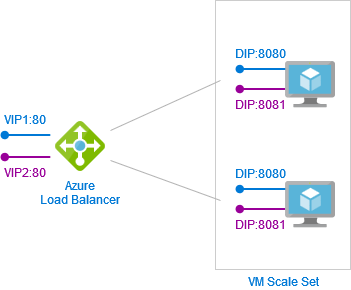
Sometimes we want to expose multiple public facing services on different domain names. For instance, we could have store.contoso.com running our e-commerce site and api.constoso.com enabling 3rd party integrations. Let's see how we can achieve that in a Service Fabric cluster running in Azure.
Azure Load Balancer supports multiple front end IP configurations and it allows us to choose which IP configuration to use with a specific load balancing rule. For every custom domain we will have a separate public IP address (and the corresponding load balancer IP configuration) and for every service we will have a dedicated load balancing rule.

Each public service must be exposed on a well-known port. For instance, the e-commerce web application is exposed on port 8080 and the API app is exposed on port 8081. The idea is to configure load balancing rules to expose these services on their dedicated public IP addresses. The e-commerce application will be made available on VIP1 on port 80 (shown in blue) and the API on VIP2 on port 80 as well (shown in purple). You will probably use port 443 in real life but the idea stays the same.
Then we just need to configure CNAME records in our DNS provider to make these services available on custom domains.
Configuring Azure Load Balancer
Let's assume we have already provisioned a cluster using one of the available templates (or just through the portal). Most likely the provisioning procedure has already configured the load balancer for us.
$lb = Get-AzureRmLoadBalancer -Name $loadBalancerName -ResourceGroupName $resourceGroupNamePublic endpoints
First of all, let's add public IP addresses for our services and the corresponding front end IP configurations. The following script can be used for each address:
$pip = New-AzureRmPublicIpAddress `
    -Name $pipName `
    -ResourceGroupName $resourceGroupName `
    -Location $location `
    -AllocationMethod Dynamic `
    -DomainNameLabel $domainNameLabel

$frontEndIpName = $pipName + 'Config'
$frontEndIp = New-AzureRmLoadBalancerFrontendIpConfig `
    -Name $frontEndIpName `
    -PublicIpAddress $pip

$lb.FrontendIpConfigurations.Add($frontEndIp)

Set-AzureRmLoadBalancer -LoadBalancer $lb
You can choose between Static and Dynamic allocation methods depending on how you want to expose your services. If you want to expose them on naked domains you have to allocate static addresses and configure A records in the DNS provider. But in our example we expose services on sub-domains and we can go with dynamic IP addresses.
Exposing services on sub-domains require us to configure CNAME records for each custom sub-domain to the default DNS name assigned to the IP address by Azure. But the default DNS name is only assigned if you specify a domain name label. For instance, if the domain name label is 'api' and our cluster is in West Europe the default domain name for the endpoint will be 'api.westeurope.cloudapp.azure.com'.
Setting up load balancing rules
Now we can create a load balancing rule together with a probe for each endpoint:
$probeName = 'AppProbe_Port_' + $backendPort
$probe = New-AzureRmLoadBalancerProbeConfig `
    -Name $probeName `
    -Protocol Tcp `
    -Port $backendPort `
    -IntervalInSeconds 15 `
    -ProbeCount 2

$lbRuleName = 'AppRule_Port_' + $backendPort
$lbRule = New-AzureRmLoadBalancerRuleConfig `
  -Name $lbRuleName `
  -FrontendIpConfiguration $frontEndIp `
  -BackendAddressPool $lb.BackendAddressPools[0] `
  -Protocol Tcp `
  -FrontendPort 80 `
  -BackendPort $backendPort `
  -Probe $probe

$lb.Probes.Add($probe)
$lb.LoadBalancingRules.Add($lbRule)

Set-AzureRmLoadBalancer -LoadBalancer $lb
Each rule references a particular IP configuration ($frontEndIp) and will be used to route traffic from port 80 on the public endpoint to the backend port on the load balancer's backend pool of addresses.
The full script can be found here.