OAuth2 Authorization Code Grant is an interactive authorization flow that enables users to give their consent for client applications to access their resources. It's meant to be used with confidential clients which are the clients that are able to keep their credentials safe. A traditional server-side web application is a confidential client. The flow requires a user agent (a browser or a web view) to handle redirections.

At the end of the post we're going to look closer at actual messages that are being exchanged between participants but for now I'd like to point out a few important aspects of the flow:
- Client applications do not gather user credentials. This is great for client applications as they don't have to manage user credentials and keep them safe. They don't have to handle password resets, multi-factor auth and so on. They can rely on identity providers to implement those tasks in compliance with the industry's best practices. And it's great for the users as the flow enables a choice of identity providers which enables reuse of their existing identities.
- Users provide their explicit consent to access their resources. This is probably the most important part as clients can only access what they were permitted to access and this information is embedded within an access token.
- The client has to authenticate with its client_Id and secret when redeeming the authorization code. This is what makes this flow somewhat irrelevant for public clients such as mobile apps running on user devices or JavaScript web applications (SPA's) as they can't be considered to be able to reliably store their secrets.
Contrast this flow to the Resource Owner Password Credentials Grant where client applications collect user credentials. In that flow there is no way for users to provide their consent and thus the so-called 'admin' consent is required to enable client applications to access protected resources. In Azure AD admin consent is given when the tenant administrator assigns a delegated permission to a client app. This automatically registers a consent for all users within the tenant. Alternatively, the admin consent can be given in an interactive flow such as the one we are looking at in this post. When calling the authorization endpoint you can append prompt=admin_consent parameter which will require the user to be a tenant administrator and once she's given her consent it will apply to all users in the organization.
There is one more point to mention before we move on. Although the flow implies authentication of a user by an identity provider it's not well suitable as a mechanism that provides the user's identity to the client. The client gets an access token which is completely opaque from the client's perspective and can only be used as is when making requests to a protected resource. Sometimes it gets worked around by exposing some sort of 'who am I' endpoint from the resource or identity provider but that requires explicit coding on the client side to consume that endpoint. And of course implementations vary and OAuth2 does not prescribe anything in this respect. It's the authorization framework that is to be used to authorize clients and this is it's primary intent.
OpenID Connect is another specification that is being widely adopted and is there to address this concern. It's an extension to OAuth2 and you will most likely use it when you need user identity on the client side but in this post we're going to focus on the bare bones OAuth2 flow.
Setting up applications in Azure AD
I'm using BookFast API as the protected API app. I've got a corresponding app in Azure AD that represents it and when I download its manifest there is already one OAuth2 permission that this app exposes:
"oauth2Permissions": [
  {
    "adminConsentDescription": "Allow the application to access book-fast-api on behalf of the signed-in user.",
    "adminConsentDisplayName": "Access book-fast-api",
    "id": "25f8afcd-0b1a-417d-9d32-c738736c63a0",
    "isEnabled": true,
    "type": "User",
    "userConsentDescription": "Allow the application to access book-fast-api on your behalf.",
    "userConsentDisplayName": "Access book-fast-api",
    "value": "user_impersonation"
  }
]
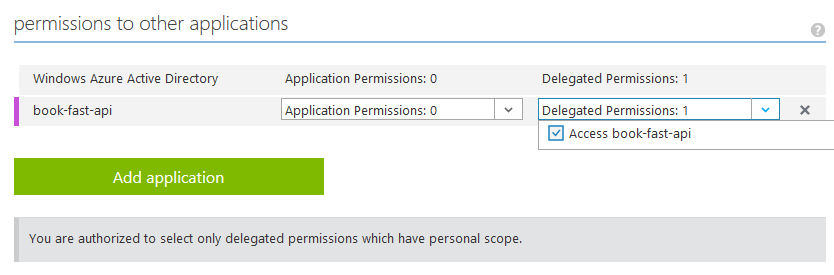
It's added by default when you provision an app in Azure AD and of course you are free to add your own permissions that make sense for your app. When the consuming app is going to be configured to access your protected API app you will be able to select just the permissions you want to enable for this particular consuming apps and these will be the permissions that will be presented to a user on the consent page.
I'm going to leave this default single one as is. The value is pretty much arbitrary, and it will be added as part of the scope claim to the access token. This enables a fine grained control on the API side when you can check if, for instance, this particular client has been assigned a particular permission. Also note the type parameter that specifies that the consent can be given by a regular user. Another option is 'Admin' which will require an administrator user.
I've also got a consuming app provisioned in Azure AD. I've generated a client secret for it as it is required as part of the Authorization Code Grant flow. As I want users to be presented a consent page upon their first login I need to assign the user_impersonation to the consuming app under a non-admin user. Otherwise it will be considered as an admin consent and all tenant users will immediately be considered as 'having agreed' and won't be presented a consent page.
In order to give a non-admin user from my tenant access to Azure portal I need to add him as a co-administrator to my subscription. This is somewhat inconvenient but hopefully will go away as the AD team is working on v2 endpoints and the new app registration portal.
Configuring OAuth2 in ASP.NET Core client app
OAuth2 is a universal spec that defines a bunch authorization flows for common scenarios but it doesn't prevent implementers from adding their specifics to the flows nor does it specify things like token format and validation, user information endpoints, metadata endpoints and so on and so forth.
There is a pretty much generic package called Microsoft.AspNet.Authentication.OAuth that provides a middleware to handle the Authorization Code Grant. You can find its source code in ASP.NET Security repo and there you will also find packages that target specific identity providers such Facebook or Twitter. These packages actually inherit from components found in Microsoft.AspNet.Authentication.OAuth and implement various details specific to their authorities.
There is no package for Azure AD and in fact it's recommended to take advantage of OpenID Connect and ADAL library instead and I'll write about them later. But in this post I'm staying focused on OAuth2.
Customizing the OAuth2 middleware
If we want to use Microsoft.AspNet.Authentication.OAuth with Azure AD we still need to customize it. If you remember from my previous posts, Azure AD requires you to specify the resource parameter when requesting access tokens. Hence, we need to extend OAuthOptions:
public class AzureADOptions : OAuthOptions
{
    public string Resource { get; set; }
}
And provide a new overload for the method that is responsible for redeeming the code:
internal class AzureADHandler : OAuthHandler<AzureADOptions>
{
    public AzureADHandler(HttpClient backchannel) : base(backchannel)
    {
    }

    protected override async Task<OAuthTokenResponse> ExchangeCodeAsync(string code, string redirectUri)
    {
        var tokenRequestParameters = new Dictionary<string, string>()
        {
            { "client_id", Options.ClientId },
            { "redirect_uri", redirectUri },
            { "client_secret", Options.ClientSecret },
            { "code", code },
            { "grant_type", "authorization_code" },
            { "resource", Options.Resource }
        };

        var requestContent = new FormUrlEncodedContent(tokenRequestParameters);

        var requestMessage = new HttpRequestMessage(HttpMethod.Post, Options.TokenEndpoint);
        requestMessage.Headers.Accept.Add(new MediaTypeWithQualityHeaderValue("application/json"));
        requestMessage.Content = requestContent;
        var response = await Backchannel.SendAsync(requestMessage, Context.RequestAborted);
        response.EnsureSuccessStatusCode();
        var payload = JObject.Parse(await response.Content.ReadAsStringAsync());
        return new OAuthTokenResponse(payload);
    }
}
You can find source code for my test client solution here.
Cookies
In traditional web applications a successful authentication normally results a cookie being added to the response so that subsequent requests wouldn't require the user to go through the authentication process all over again. In our case it's not really authentication from the client app's perspective but rather an authorization to access a protected API. However, we still want to drop a cookie to identify an authorized session. We will also use the cookie as the storage mechanism for access and refresh tokens. Thus, we need another middleware from the same security repo: Microsoft.AspNet.Authentication.Cookies.
Configuring the middleware
We are ready to configure both the cookie and our custom OAuth2 middleware now.
app.UseCookieAuthentication(options => options.AutomaticAuthenticate = true);
app.UseAzureAD(options =>
               {
                   options.AuthenticationScheme = "AzureAD";
                   options.AutomaticChallenge = true;

                   options.SignInScheme = CookieAuthenticationDefaults.AuthenticationScheme;

                   options.AuthorizationEndpoint = authOptions.Value.AuthorizationEndpoint;
                   options.TokenEndpoint = authOptions.Value.TokenEndpoint;
                   options.ClientId = authOptions.Value.ClientId;
                   options.ClientSecret = authOptions.Value.ClientSecret;
                   options.CallbackPath = new Microsoft.AspNet.Http.PathString("/oauth");

                   options.Resource = authOptions.Value.Resource;

                   options.SaveTokensAsClaims = true;
               });
Again, if anything looks unclear you can always check out the whole source code here.
AutomaticAuthenticate option makes the cookie middleware initialize the ClaimsPrinicipal when it finds a valid cookie in the request.
Any middleware that's capable of performing any kind of authentication should be identified by a scheme and it can be selected later by that scheme. Remember that we have inherited from a generic Microsoft.AspNet.Authentication.OAuth and we need to provide some scheme name for it, e.g. 'Azure AD'. Also notice the SignInScheme parameter. When we obtain an access token and create a ClaimPrinicipal we want to actually perform a sign-in and we select the cookies middleware by its scheme to do the job. The cookies middleware will serialize all claims from the principal and put that in the cookie payload that it's going to add to the response. And because we set SaveTokensAsClaims to true our access and refresh claims are going to end up in the cookie payload as well. It will increase the cookie size of course but it's the simplest way to implement tokens persistence.
There are a bunch of Azure AD specific settings. You can obtain AuthorizationEndpoint and TokenEndpoint addresses for your tenant from the portal. ClientId and ClientSecret of your client app are self-explanatory. The CallbackPath is the relative address that Azure AD will post the authorization code to. We don't have to provide an existing route for it, the middleware will take care of handling it. However we do have to properly configure the reply URL for the client app in Azure AD, e.g.:

resource parameter is the App ID of BookFast API, e.g. 'https://devunleashed.onmicrosoft.com/book-fast-api'.
AutomaticChallenge option will make the OAuth middleware kick in when 401 is flowing back from MVC and start the flow. If you don't enable automatic challenge you're going to have to initiate explicitly through the AuthenticationManager selecting the desired authentication scheme. This is what you normally do when your application provides multiple authentication options to the users.
Handling sign-out
We also want to be able to clear that auth cookie. In other words, implement a 'sign-out' experience. We can add a simple controller to do that:
public class AuthController : Controller
{
    public async Task<IActionResult> SignOut()
    {
        await HttpContext.Authentication.SignOutAsync(CookieAuthenticationDefaults.AuthenticationScheme);
        return RedirectToAction("Index", "Home");
    }
}
Calling the protected API
I've added a simple action to query pending booking requests of the current user:
[Authorize]
public async Task<IActionResult> Bookings()
{
    ViewBag.Title = "Hello, stranger!";
    var bookings = await proxy.LoadBookingsAsync(User.FindFirst("access_token").Value);

    return View(bookings);
}
The access token is retrieved from the current principal's claim. There is also a refresh token and you should take care of implementing proper refresh logic in your apps. One great option will be taking advantage of ADAL library to manage tokens for you then you have to think about tokens persistence as the library be default stores them in memory. This is a great topic to explore but it's slightly out of this post's scope.
The proxy is basically a simple adapter over HttpClient and you can check it out on GitHub if you like.
And notice the 'Hello, stranger!' title value that I'm passing to the view. This is to emphasize the point that even though the user authenticates against Azure AD and authorizes the client to call the API on her behalf, the client itself has no idea who the user is unless you implement a way for the client to find it out but it has nothing to do with OAuth.
Handling requests in Azure AD protected API
I've actually covered what's happening on the API side in details in one of my previous posts so I'll just point you to it. I've described the receiving middleware, token format and validation and I also showed a couple of other OAuth2 flows to obtain access tokens.
Testing out the flow
It all starts with navigating to the protected Bookings action:
GET https://localhost:44378/Home/Bookings HTTP/1.1


HTTP/1.1 302 Found
Content-Length: 0
Location: https://login.microsoftonline.com/70005c1f-ea47-488e-8f57-c3543485f1d0/oauth2/authorize?client_id=8de1855f-f70d-4e3d-a05b-e2490cdee480&scope=&response_type=code&redirect_uri=https%3A%2F%2Flocalhost%3A44378%2Foauth&state=CfDJ8FBErJFK6EtMkyn6lrdZyOoGGm-1uAX89fdLJW80PGnPG2p7RyuYyETsMGN8XkGPsAhpBCIfBRCadCKz0JDX0mm7vMvk0oKXNi7PaeVxzwwn6AfRVXajCEPts8kUGCO0dOJSw5zZVBJvakHFCs3iEumMcwK0pq34iBTiugzBSIbuxM1sxAJeBXvO7jmE4PVIeAsxECKgDYK_CJkDULTyT6WIHl1J9ZLoZOjPr4a6YY0HXoxjvbpA7mz7_jMEv68VfwpleEHusVh-xQVnoi3Nz9pyjfWsj-9c9cfx-erpPiIx
Server: Kestrel
Set-Cookie: .AspNet.Correlation.AzureAD=crEHiJ3ZBw7x-oqul30R00lPCf6d50OfocRK9Xip5Fo; path=/; secure; httponly
The automatic challenge kicked in and redirected the user agent to the Azure AD authorization endpoint. We see the expected parameters such as client_id, response_type=code and redirect_uri. Notice the state parameter that is encrypted by the middleware and .AspNet.Correlation.AzureAD cookie. This is the way the middleware implements CSRF protection. It is important to insure that the authorization code that will be delivered back to us has been actually retrieved as a result of an authorization action triggered by a legitimate user in our client application. The authority (Azure AD in our case) is required to return the same value of the state parameter that it has been given and the value of the .AspNet.Correlation.AzureAD cookie is included as part of the state. The middleware will compare both values before redeeming the code.
Once redirected to Azure AD the user experience depends on various factors: whether she's already signed in with Azure AD, whether she had already provided her consent before or the administrator had provided consent for the whole tenant.
If none of the above is true the user will be asked for her credentials and consent:
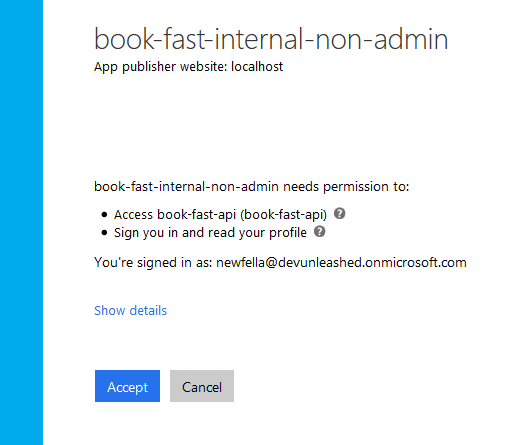
You recognize 'Access book-fast-api' permission that we added to the API app and assigned to the client app. There is also 'Sign you in and read your profile' permission that is coming from 'Azure Active Directory' app and is added automatically to every application that you provision in Azure AD. This permission gives a read access to a user profile to your client app and is required for any app that needs to authenticate users.
Once user authentication has been successful and the consent has been received Azure AD redirects the user agent to redirect_uri together with an authorization code:
HTTP/1.1 302 Found
Location: https://localhost:44378/oauth?code=<authorization code value>&state=CfDJ8FBErJFK6EtMkyn6lrdZyOoGGm-1uAX89fdLJW80PGnPG2p7RyuYyETsMGN8XkGPsAhpBCIfBRCadCKz0JDX0mm7vMvk0oKXNi7PaeVxzwwn6AfRVXajCEPts8kUGCO0dOJSw5zZVBJvakHFCs3iEumMcwK0pq34iBTiugzBSIbuxM1sxAJeBXvO7jmE4PVIeAsxECKgDYK_CJkDULTyT6WIHl1J9ZLoZOjPr4a6YY0HXoxjvbpA7mz7_jMEv68VfwpleEHusVh-xQVnoi3Nz9pyjfWsj-9c9cfx-erpPiIx&session_state=ee505bf3-c0b5-43ea-80c9-f9110d3993a1
The middleware handles requests to '/oauth' route as we have configured it earlier:
GET https://localhost:44378/oauth?code=<authorization code value>&state=CfDJ8FBErJFK6EtMkyn6lrdZyOoGGm-1uAX89fdLJW80PGnPG2p7RyuYyETsMGN8XkGPsAhpBCIfBRCadCKz0JDX0mm7vMvk0oKXNi7PaeVxzwwn6AfRVXajCEPts8kUGCO0dOJSw5zZVBJvakHFCs3iEumMcwK0pq34iBTiugzBSIbuxM1sxAJeBXvO7jmE4PVIeAsxECKgDYK_CJkDULTyT6WIHl1J9ZLoZOjPr4a6YY0HXoxjvbpA7mz7_jMEv68VfwpleEHusVh-xQVnoi3Nz9pyjfWsj-9c9cfx-erpPiIx&session_state=ee505bf3-c0b5-43ea-80c9-f9110d3993a1 HTTP/1.1
Cookie: .AspNet.Correlation.AzureAD=crEHiJ3ZBw7x-oqul30R00lPCf6d50OfocRK9Xip5Fo


HTTP/1.1 302 Found
Cache-Control: no-cache
Pragma: no-cache
Content-Length: 0
Expires: -1
Location: https://localhost:44378/Home/Bookings
Server: Kestrel
Set-Cookie: .AspNet.Correlation.AzureAD=; expires=Thu, 01 Jan 1970 00:00:00 GMT; path=/
Set-Cookie: .AspNet.Cookies=<auth cookie value>; path=/; secure; httponly
Wait, something has to be missing here! Before issuing that redirect response to 'https://localhost:44378/Home/Bookings' the middleware validated the state and redeemed the authorization code:
POST https://login.microsoftonline.com/70005c1f-ea47-488e-8f57-c3543485f1d0/oauth2/token HTTP/1.1
Accept: application/json
User-Agent: Microsoft ASP.NET OAuth middleware

client_id=8de1855f-f70d-4e3d-a05b-e2490cdee480&redirect_uri=https%3A%2F%2Flocalhost%3A44378%2Foauth&client_secret=<client secret>&code=<authorization code value>&grant_type=authorization_code&resource=https%3A%2F%2Fdevunleashed.onmicrosoft.com%2Fbook-fast-api


HTTP/1.1 200 OK
Content-Type: application/json; charset=utf-8
Content-Length: 2932

{
    "token_type": "Bearer",
    "scope": "user_impersonation",
    "expires_in": "3599",
    "expires_on": "1463157915",
    "not_before": "1463154015",
    "resource": "https://devunleashed.onmicrosoft.com/book-fast-api",
    "access_token": "<access token value>",
    "refresh_token": "<refresh token value>",
    "id_token": "<id token value>"
}
Obtained tokens have been added as claims to the ClaimsPrincipal and serialized into '.AspNet.Cookies' cookie that was set up in the final redirect to 'https://localhost:44378/Home/Bookings'.
What's the id_token that we see in the response from the token endpoint? Azure AD tries to make a client app developer's life easier and includes an OpenID Connect ID token in the response. ID tokens are meant to be consumed (i.e. parsed) by clients to obtain identity information of their users. Should we use it here? Well, it's not part of OAuth2 spec and thus we probably can't rely on this behavior of Azure AD to be preserved in the future. Besides, if we want ID tokens we should start talking OpenID Connect to Azure AD in the first place!