It's been over 1.5 years since I'd posted an article on integrating ASP.NET Core 1.x applictions with Azure AD B2C. As I was upgrading my sample application to ASP.NET Core 2.0 it became obvious that changes that I had to make were not only limited to the revamped authentication middleware and security related APIs (a great summary of which can be found in this issue on GitHub). Azure AD B2C has greatly evolved too and now it supports separate API and client apps, delegated access configured with scopes and proper access tokens.
It's too many changes that have literally rendered my previous post obsolete and prompted me to write a new version of it.
Test application
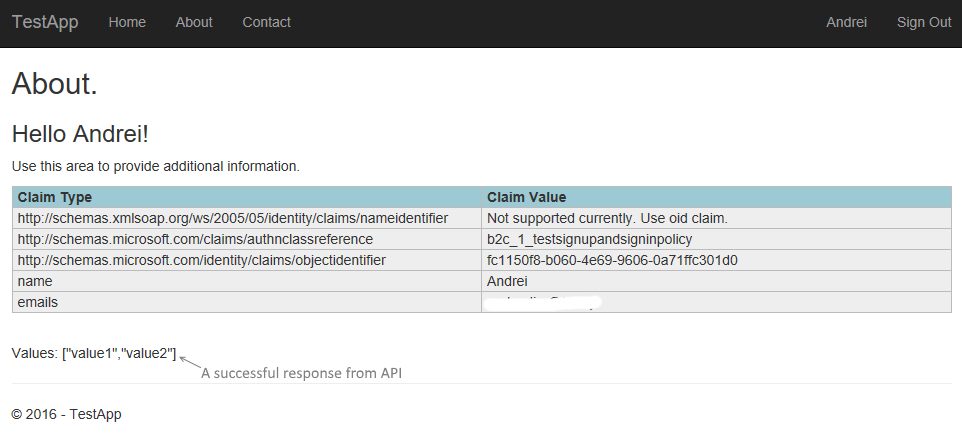
A sample application is available on GitHub. It consists of a Web API project (which is pretty much the default template armored with JWT Bearer authentication middleware) and an MVC client that calls the API and displays a list of claims it receives in the ID token.
The application uses the Hybrid Flow and supports common customer facing scenarios such as self sign-up, profile editing and password reset. It demoes configuration of the ASP.NET Core authentication middleware for OpenID Connect and the Microsoft Authentication Library (MSAL).
Configuring Azure AD B2C applications and policies
Just like you do in the regular Azure AD you can now register separate applications in B2C to represent your APIs and client applications. You can further fine-tune what delegated permissions are required by the clients and you get normal access tokens in additional to ID and refresh tokens from Azure AD B2C (for those who are new to B2C, in the past you had to use the same app for APIs and clients and use ID tokens in place of access tokens when calling your APIs).
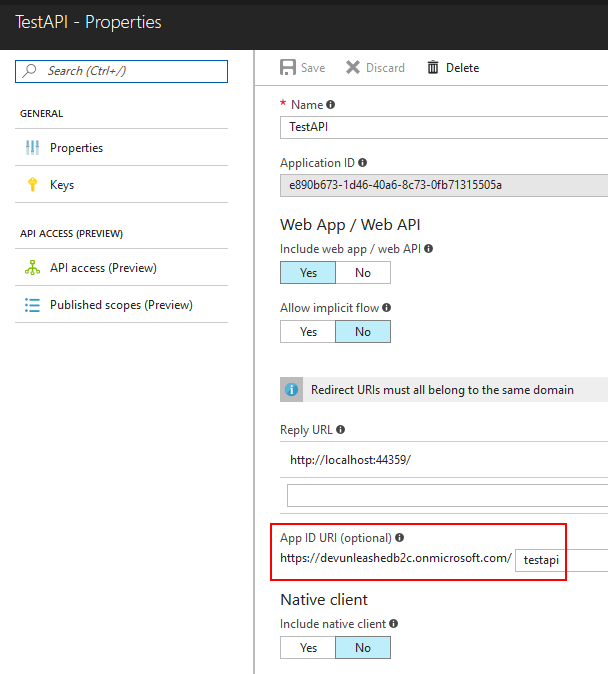
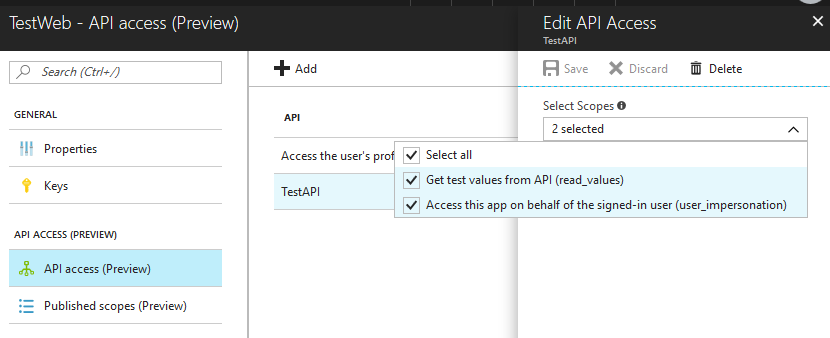
One important setting to make sure to specify for the API app is the App ID Uri. This Uri is going to be used as a prefix for custom scopes that your API exposes and that should be requested by clients.
You declare your custom scopes in the "Published scopes" section of the API app.
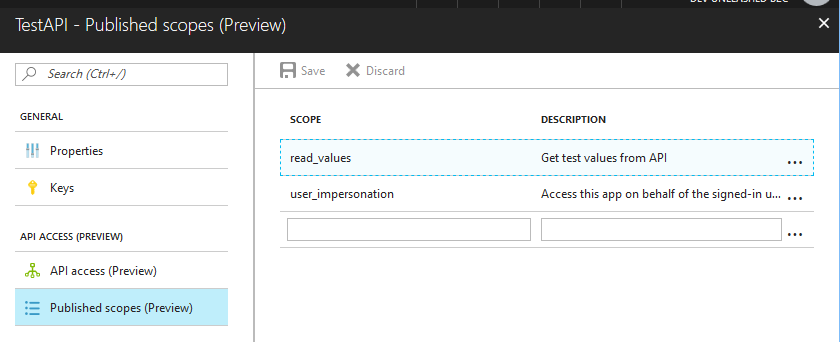
Combined with the App ID our sample published scope will be
https://devunleashedb2c.onmicrosoft.com/testapi/read_valuesThis is the value that should be included as part of the scope parameter by the client when making requests to authorize and/or token endpoints. Note by default all apps come with the user_impersonation scope that can be used if there is no need to limit what portions of the APIs are available for particular clients and they just need to be able to call the APIs on behalf of signed in users.
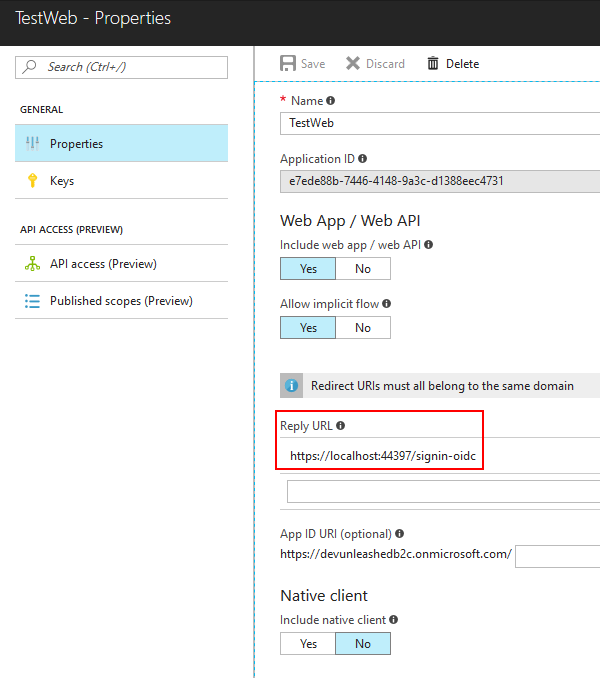
For the client app it's important to specify reply Url(s) which should contain those to be specified when making requested to the directory.
If your client is confidential (that is, a server side application) you need to generate client keys in the appropriate section of the blade. Full client credentials are required by the Authorization Code and the Hybrid flows.
Finally, you assign exposed scopes of APIs that need to be available to clients.
Create and configure B2C policies
In Azure AD B2C policies define the end user experience and enable much greater customization options than the ones available in the classic directory. Official documentation covers policies and other concepts in great details so I suggest you have a look at it.
In Azure AD B2C the policy is a required parameter in requests to authorization and token endpoints. For instance, if we query the metadata endpoint with a particular policy:
GET https://login.microsoftonline.com/devunleashedb2c.onmicrosoft.com/v2.0/.well-known/openid-configuration?p=b2c_1_testsignupandsigninpolicyWe get the following output:
{
  "issuer": "https://login.microsoftonline.com/bc2fb659-725b-48d8-b571-7420094e41cc/v2.0/",
  "authorization_endpoint": "https://login.microsoftonline.com/devunleashedb2c.onmicrosoft.com/oauth2/v2.0/authorize?p=b2c_1_testsignupandsigninpolicy",
  "token_endpoint": "https://login.microsoftonline.com/devunleashedb2c.onmicrosoft.com/oauth2/v2.0/token?p=b2c_1_testsignupandsigninpolicy",
  "end_session_endpoint": "https://login.microsoftonline.com/devunleashedb2c.onmicrosoft.com/oauth2/v2.0/logout?p=b2c_1_testsignupandsigninpolicy",
  "jwks_uri": "https://login.microsoftonline.com/devunleashedb2c.onmicrosoft.com/discovery/v2.0/keys?p=b2c_1_testsignupandsigninpolicy",
  "response_modes_supported": [
    "query",
    "fragment",
    "form_post"
  ],
  "response_types_supported": [
    "code",
    "id_token",
    "code id_token"
  ],
  "scopes_supported": [
    "openid"
  ],
  "subject_types_supported": [
    "pairwise"
  ],
  "id_token_signing_alg_values_supported": [
    "RS256"
  ],
  "token_endpoint_auth_methods_supported": [
    "client_secret_post"
  ],
  "claims_supported": [
    "oid",
    "newUser",
    "idp",
    "emails",
    "name",
    "sub"
  ]
}
Not only does it provide policy specific endpoints, it also gives information about claims that I configured to be included in tokens for this specific policy.
There are 2 ways you can specify the policy:
- as a
pquery string parameter as in the example above - as a URL segment when using special
tfpURL format
public string GetAuthority(string policy) => $"{Instance}tfp/{TenantId}/{policy}/v2.0";So in our example, we could have called the metadata endpoint with the following URL:
https://login.microsoftonline.com/tfp/devunleashedb2c.onmicrosoft.com/b2c_1_testsignupandsigninpolicy/v2.0/.well-known/openid-configurationAnd the response would indicate:
https://login.microsoftonline.com/te/devunleashedb2c.onmicrosoft.com/b2c_1_testsignupandsigninpolicy/oauth2/v2.0/authorizeas the authorize endpoint.
While we're at it, it's essential that we properly configure claims to be included in tokens when using all planned policies. Each policy has the same set of settings and first of all it's important to include the Object ID claim which is the unique identifier of the user.
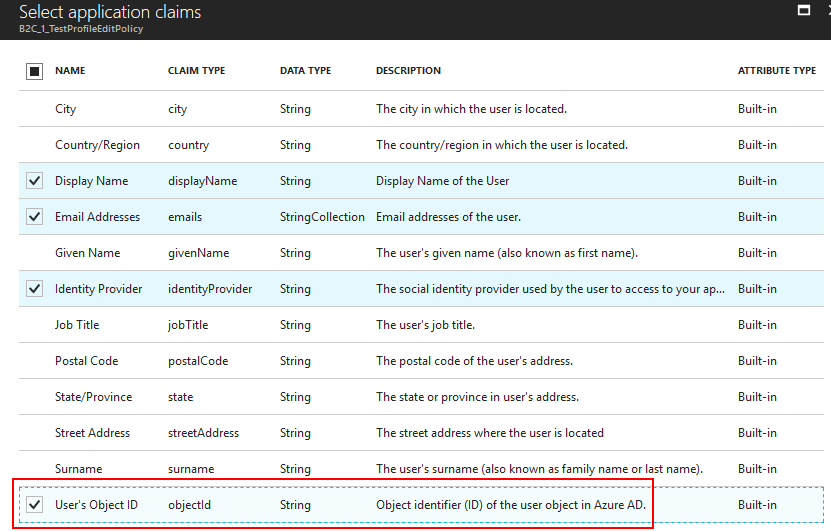
It's important to enable it in all policies that are going to be used in your application and here is why. Different scenarios such as profile editing or password reset are handled by redirecting the user to the authorize endpoint. And upon return the application is supposed to reconstruct the security context and follow the OpenID Connect spec to redeem the authorization code (yes, all these scenarios are piggy backed on the standard flows). User ID is the essential claim to be present in all responses from the authorize endpoint. For example, it's used as part of the token's cache key which we're going to talk about later in this post.
There are a couple of more settings affecting claims which are specified at the policy level:
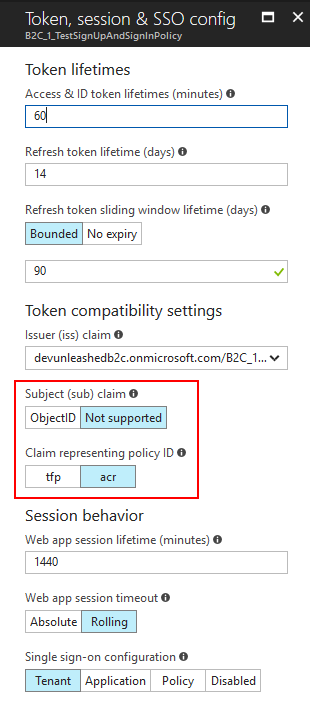
The first one is the sub claim that often represents the user ID. Because we've already included the Object ID (oid claim mapped to http://schemas.microsoft.com/identity/claims/objectidentifier claim type used in .NET) we can disable it (that's why you see the unsupported message for the nameidentifier .NET claim in the sample application).
The second claim is the one that identifies the policy that was used to call the authorize endpoint. This claim is used later when you need to redeem the authorization code by calling the appropriate token endpoint or when signing out the user. By default it's set to acr which is mapped to http://schemas.microsoft.com/claims/authnclassreference claim type in .NET.
By the way, all these claim mappings can be customized and even disabled so you can use short claim types (e.g. sub, scp, etc) but this is a topic for another post.
Our sample application requires 3 policies:
- Sign up and Sign in. This is a combined policy that enables self sign-up.
- Profile editing.
- Password reset.
Configuring Web API
Configuration of Microsoft.AspNetCore.Authentication.JwtBearer middleware in your API apps is quite simple:
public void ConfigureServices(IServiceCollection services)
{
    services.Configure<AuthenticationOptions>(configuration.GetSection("Authentication:AzureAd"));

    var serviceProvider = services.BuildServiceProvider();
    var authOptions = serviceProvider.GetService<IOptions<AuthenticationOptions>>();

    services.AddAuthentication(JwtBearerDefaults.AuthenticationScheme) // sets both authenticate and challenge default schemes
        .AddJwtBearer(options =>
        {
            options.MetadataAddress = $"{authOptions.Value.Authority}/.well-known/openid-configuration?p={authOptions.Value.SignInOrSignUpPolicy}";
            options.Audience = authOptions.Value.Audience;
        });
}
Instead of setting the authority (which is the tenant's URL in the classic directory), you specify the full URL to the OpenID Connect metadata endpoint. This way you can specify the policy parameter. What's interesting is that even though you can request access tokens using various policies your API app will be able to validate them using just any of them.
Configuring MVC client
In a web client you use a pair of the Cookies and OpenID Connect middleware and also the Microsoft Authentication Library to help with token management.
Configuration of the middleware is slightly more involved:
private static void ConfigureAuthentication(IServiceCollection services)
{
    var serviceProvider = services.BuildServiceProvider();

    var authOptions = serviceProvider.GetService<IOptions<B2CAuthenticationOptions>>();
    var b2cPolicies = serviceProvider.GetService<IOptions<B2CPolicies>>();

    var distributedCache = serviceProvider.GetService<IDistributedCache>();
    // this is needed when using in-memory cache (because 2 different service providers are going to be used and thus 2 in-memory dictionaries)
    services.AddSingleton(distributedCache);

    services.AddAuthentication(options =>
    {
        options.DefaultScheme = CookieAuthenticationDefaults.AuthenticationScheme;
        options.DefaultChallengeScheme = Constants.OpenIdConnectAuthenticationScheme;
    })
    .AddCookie()
    .AddOpenIdConnect(Constants.OpenIdConnectAuthenticationScheme, options =>
    {
        options.Authority = authOptions.Value.Authority;
        options.ClientId = authOptions.Value.ClientId;
        options.ClientSecret = authOptions.Value.ClientSecret;
        options.SignedOutRedirectUri = authOptions.Value.PostLogoutRedirectUri;

        options.ConfigurationManager = new PolicyConfigurationManager(authOptions.Value.Authority,
                                       new[] { b2cPolicies.Value.SignInOrSignUpPolicy, b2cPolicies.Value.EditProfilePolicy, b2cPolicies.Value.ResetPasswordPolicy });

        options.Events = CreateOpenIdConnectEventHandlers(authOptions.Value, b2cPolicies.Value, distributedCache);

        options.ResponseType = OpenIdConnectResponseType.CodeIdToken;
        options.TokenValidationParameters = new TokenValidationParameters
        {
            NameClaimType = "name"
        };

        // we have to set these scope that will be used in /authorize request
        // (otherwise the /token request will not return access and refresh tokens)
        options.Scope.Add("offline_access");
        options.Scope.Add($"{authOptions.Value.ApiIdentifier}/read_values");
    });
}
Notice how you set the OpenID Connect middleware to be used for challenge requests and the Cookie middleware for the rest. Another important thing to remember is to include the same set of scopes when redirecting the the authorize endpoint as well as redeeming the authorization code (shown below). Otherwise the response from the token endpoint won't include access and refresh tokens.
The role of the custom configuration manager becomes apparent in various event handlers:
private static OpenIdConnectEvents CreateOpenIdConnectEventHandlers(B2CAuthenticationOptions authOptions, B2CPolicies policies, IDistributedCache distributedCache)
{
    return new OpenIdConnectEvents
    {
        OnRedirectToIdentityProvider = context => SetIssuerAddressAsync(context, policies.SignInOrSignUpPolicy),
        OnRedirectToIdentityProviderForSignOut = context => SetIssuerAddressForSignOutAsync(context, policies.SignInOrSignUpPolicy),
        OnAuthorizationCodeReceived = async context =>
                                      {
                                          ...
                                      },
        OnMessageReceived = context =>
        {
            ...
        }
    };
}

private static async Task SetIssuerAddressAsync(RedirectContext context, string defaultPolicy)
{
    var configuration = await GetOpenIdConnectConfigurationAsync(context, defaultPolicy);
    context.ProtocolMessage.IssuerAddress = configuration.AuthorizationEndpoint;
}

private static async Task SetIssuerAddressForSignOutAsync(RedirectContext context, string defaultPolicy)
{
    var configuration = await GetOpenIdConnectConfigurationAsync(context, defaultPolicy);
    context.ProtocolMessage.IssuerAddress = configuration.EndSessionEndpoint;
}

private static Task<OpenIdConnectConfiguration> GetOpenIdConnectConfigurationAsync(RedirectContext context, string defaultPolicy)
{
    var manager = (PolicyConfigurationManager)context.Options.ConfigurationManager;
    var policy = context.Properties.Items.ContainsKey(Constants.B2CPolicy) ? context.Properties.Items[Constants.B2CPolicy] : defaultPolicy;

    return manager.GetConfigurationByPolicyAsync(CancellationToken.None, policy);
}
The idea is to use proper URLs for the authorize endpoint depending on the policy that is set by the AccountController in response to appropriate actions: sign in, sign up, edit profile, password reset or sign out. Please check out the code to get a better picture of how things work. The alternative solution would be using the tfp URL formats and replacing the policy name in the URL itself.
Using MSAL to redeem authorization code and manage tokens
Microsoft Authentication Library (MSAL) is the "next generation" library for managing tokens that should be used with v2 endpoints (as apposed to Active Directory Authentication Library (ADAL) that is to be used with classic v1 endpoints).
You redeem the authorization code in OnAuthorizationCodeReceived event handler:
OnAuthorizationCodeReceived = async context =>
{
    try
    {
        var principal = context.Principal;

        var userTokenCache = new DistributedTokenCache(distributedCache, principal.FindFirst(Constants.ObjectIdClaimType).Value).GetMSALCache();
        var client = new ConfidentialClientApplication(authOptions.ClientId,
            authOptions.GetAuthority(principal.FindFirst(Constants.AcrClaimType).Value),
            "https://app", // it's not really needed
            new ClientCredential(authOptions.ClientSecret),
            userTokenCache,
            null);

        var result = await client.AcquireTokenByAuthorizationCodeAsync(context.TokenEndpointRequest.Code,
            new[] { $"{authOptions.ApiIdentifier}/read_values" });

        context.HandleCodeRedemption(result.AccessToken, result.IdToken);
    }
    catch (Exception ex)
    {
        context.Fail(ex);
    }
}
There are a few important notes to make here:
- Specifying a per-user token cache (described below).
- Specifying the authority using the
tfpformat and policy name from theacrclaim. This is important as this code is going to get executed as part of sign-in, profile editing and password reset flows. Failure to provide the correct policy will result in the following error:AADB2C90088: The provided grant has not been issued for this endpoint. Actual Value : B2C_1_TestSignUpAndSignInPolicy and Expected Value : B2C_1_TestProfileEditPolicy. - Sending the same set of claims the
tokenendpoint that you send to theauthorizeendpoint. - Notifying the OpenID Connect middleware that you've redeemed the code by calling
HandleCodeRedemption.
Implementing a distributed token cache
I've seen crazy implementations of the token cache even in official samples. It's much more straightforward when your cache is implemented on a per-user basis. I've already described such an implemented for ADAL here and here's the version for MSAL:
internal class DistributedTokenCache
{
    private readonly IDistributedCache distributedCache;
    private readonly string userId;

    private readonly TokenCache tokenCache = new TokenCache();

    public DistributedTokenCache(IDistributedCache cache, string userId)
    {
        this.distributedCache = cache;
        this.userId = userId;

        tokenCache.SetBeforeAccess(OnBeforeAccess);
        tokenCache.SetAfterAccess(OnAfterAccess);
    }

    public TokenCache GetMSALCache() => tokenCache;

    private void OnBeforeAccess(TokenCacheNotificationArgs args)
    {
        var userTokenCachePayload = distributedCache.Get(CacheKey);
        if (userTokenCachePayload != null)
        {
            tokenCache.Deserialize(userTokenCachePayload);
        }
    }

    private void OnAfterAccess(TokenCacheNotificationArgs args)
    {
        if (tokenCache.HasStateChanged)
        {
            var cacheOptions = new DistributedCacheEntryOptions
            {
                AbsoluteExpirationRelativeToNow = TimeSpan.FromDays(14)
            };

            distributedCache.Set(CacheKey, tokenCache.Serialize(), cacheOptions);

            tokenCache.HasStateChanged = false;
        }
    }

    private string CacheKey => $"TokenCache_{userId}";
}
The cache relies on IDistributedCache abstraction and you get in-memory, Redis and SQL Server implementations in ASP.NET Core out of the box.
Calling the API
When calling the API you need to obtain access token from MSAL cache (and let it handle token refresh if appropriate):
public async Task<string> GetValuesAsync()
{
    var client = new HttpClient { BaseAddress = new Uri(serviceOptions.BaseUrl, UriKind.Absolute) };
    client.DefaultRequestHeaders.Authorization =
        new AuthenticationHeaderValue("Bearer", await GetAccessTokenAsync());

    return await client.GetStringAsync("api/values");
}

private async Task<string> GetAccessTokenAsync()
{
    try
    {
        var principal = httpContextAccessor.HttpContext.User;

        var tokenCache = new DistributedTokenCache(distributedCache, principal.FindFirst(Constants.ObjectIdClaimType).Value).GetMSALCache();
        var client = new ConfidentialClientApplication(authOptions.ClientId,
                                                  authOptions.GetAuthority(principal.FindFirst(Constants.AcrClaimType).Value),
                                                  "https://app", // it's not really needed
                                                  new ClientCredential(authOptions.ClientSecret),
                                                  tokenCache,
                                                  null);

        var result = await client.AcquireTokenSilentAsync(new[] { $"{authOptions.ApiIdentifier}/read_values" },
            client.Users.FirstOrDefault());

        return result.AccessToken;
    }
    catch (MsalUiRequiredException)
    {
        throw new ReauthenticationRequiredException();
    }
}
If the refresh token has expired (or for whatever reason there was no access token in cache) we have to propose the user to re-authenticate. Notice that we translate MsalUiRequiredException into our custom ReauthenticationRequiredException which is handled by the global exception filter by initiating the challenge flow:
public void OnException(ExceptionContext context)
{
    if (!context.ExceptionHandled && IsReauthenticationRequired(context.Exception))
    {
        context.Result = new ChallengeResult(
                Constants.OpenIdConnectAuthenticationScheme,
                new AuthenticationProperties(new Dictionary<string, string> { { Constants.B2CPolicy, policies.SignInOrSignUpPolicy } })
                {
                    RedirectUri = context.HttpContext.Request.Path
                });

        context.ExceptionHandled = true;
    }
}
Handle profile editing
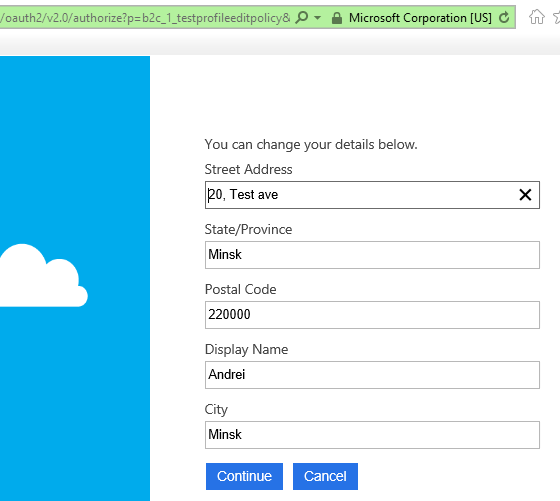
One of the policy types supported by Azure AD B2C is profile editing which allows users to provide their info such as address details, job title, etc. The way you trigger this whole process is by returning a ChallengeResult, e.g.:
public IActionResult Profile()
{
    if (User.Identity.IsAuthenticated)
    {
        return new ChallengeResult(
            Constants.OpenIdConnectAuthenticationScheme,
            new AuthenticationProperties(new Dictionary<string, string> { { Constants.B2CPolicy, policies.EditProfilePolicy } })
            {
                RedirectUri = "/"
            });
    }

    return RedirectHome();
}
This will successfully redirect the user to the profile editing page:
If the user hits 'Continue' she will be redirected back to the application with the regular authentication response containing state, nonce, authorization code and ID token (depending on the OpenID Connect flow).
But if the user hits 'Cancel' Azure AD B2C will return an error response, oops:
POST https://localhost:8686/signin-oidc-b2c HTTP/1.1
Content-Type: application/x-www-form-urlencoded

error=access_denied
&
error_description=AADB2C90091: The user has cancelled entering self-asserted information.
Correlation ID: 3ed683a1-d742-4f59-beb8-86bc22bb7196
Timestamp: 2017-01-30 12:15:15Z
This somewhat unexpected response from Azure AD makes the middleware fail the authentication process. And it's correct from the middleware's standpoint as there are no artifacts to validate.
To mitigate this we're going to have to intercept the response and prevent the middleware from raising an error:
OnMessageReceived = context =>
{
    if (!string.IsNullOrEmpty(context.ProtocolMessage.Error) &&
        !string.IsNullOrEmpty(context.ProtocolMessage.ErrorDescription))
    {
        if (context.ProtocolMessage.ErrorDescription.StartsWith("AADB2C90091")) // cancel profile editing
        {
            context.HandleResponse();
            context.Response.Redirect("/");
        }
    }

    return Task.FromResult(0);
}
There is nothing we need to do in regards to the security context because profile editing could only be triggered when the user had already been signed in.
Handle password reset
Password reset is another essential self-service flow supported by Azure AD B2C. However as any other flow it's handled by sending the user to the authorize endpoint and because the 'Sign up or sign in' policy does not support it (for the time being) we're going to get sent back to the middleware with an error: AADB2C90118: The user has forgotten their password. when the user clicks 'Forgot your password?'.
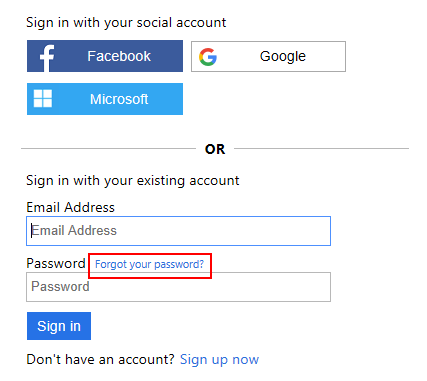
You can handle it again in the OnMessageReceived by redirecting to the dedicated action:
OnMessageReceived = context =>
{
    if (!string.IsNullOrEmpty(context.ProtocolMessage.Error) &&
        !string.IsNullOrEmpty(context.ProtocolMessage.ErrorDescription))
    {
        ...
        else if (context.ProtocolMessage.ErrorDescription.StartsWith("AADB2C90118")) // forgot password
        {
            context.HandleResponse();
            context.Response.Redirect("/Account/ResetPassword");
        }
    }

    return Task.FromResult(0);
}
which will trigger another challenge flow with the proper policy:
public IActionResult ResetPassword()
{
return new ChallengeResult(
Constants.OpenIdConnectAuthenticationScheme,
new AuthenticationProperties(new Dictionary<string, string> { { Constants.B2CPolicy, policies.ResetPasswordPolicy } })
{
RedirectUri = "/"
});
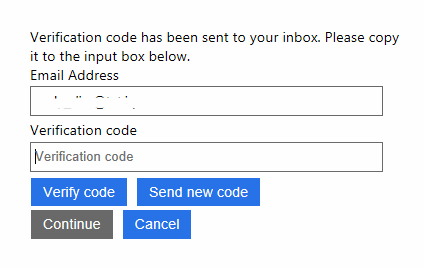
}Azure AD B2C will verify the user by sending a code to her email:
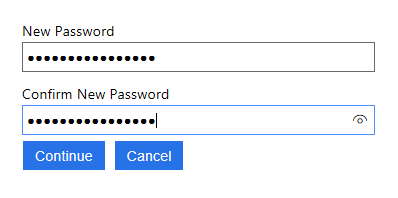
And finally let the user provide a new password for her account:
This has been a lengthy post but I wanted to cover most of the essential stuff you need to know to integrate your solutions with Azure AD B2C. As has been mentioned, the full demo application can be found here.